Lessons · Lesson 2 of 3
Seam allowances, notches, and walking the seams
Read a pattern's internal arithmetic: why an allowance is chosen per seam, what a notch is actually instructing, and how two pieces that both measure correctly fail to sew together.
Lesson 2 of 3 · 46 min
26 June: the second comment, also carried out exactly
Around the edge of every pattern piece runs a strip of cloth that will be folded inside the seam. That strip is the seam allowance. There are also small cuts in the edge, called notches, telling the operator which point meets which. Neither is decoration. The machine that will sew the seam decides the width of the strip. The second half of this lesson is about checking that two pieces will actually fit each other.
The 19 June fit session on KM-118 produced two comments. The bicep was the first. This was the second:
Front neck reads high on the model. Please release 0.6 cm.
Rosetta's pattern room scooped the front neckline by 0.6 cm at centre front and blended it out to the shoulder. Rev B went out on 26 June. The buyer approved the second sample on 8 July.
The neckline is now 44.8 cm, walked from centre front, round the front neck, over the shoulder, across the back neck and down to the other centre front. It was 44.2 cm.
The collar stand is still 44.2 cm, because nobody touched it, and nobody touched it because nobody was asked to.
An allowance is chosen per seam, not per garment
The first thing to understand about a seam allowance is that it is not a house style. It is decided seam by seam, by the machine that will sew it and the finish it has to produce.
| Seam | Allowance | Machine and finish | Why that number |
|---|---|---|---|
| Yoke and shoulder | 1.2 cm | Twin-needle lap-felled, folder | The folder needs the cloth to make the fold |
| Side and underarm | 1.0 cm | Five-thread safety stitch, 516 | The overlock trims as it sews |
| Armhole, sleeve set | 1.2 cm | Lap-felled, folder | Same folder family as the yoke |
| Neckline to collar stand | 0.7 cm | Lockstitch, 301 | A tight curve; a wide allowance will not lie flat |
| Cuff to sleeve | 0.7 cm | Lockstitch, 301 | Turned inside the cuff |
| Pocket edge | 0.7 cm | Turned and topstitched | Enough to turn, not enough to bulk |
| Front placket | 3.2 cm | Folded, twin-needle | A folded placket, not an allowance at all |
| Hem | 2.0 cm | Double-turned, 1.0 cm and 1.0 cm | Two folds, so twice the fold depth |
A 1.2 cm allowance on the collar-stand curve would buckle, because the outer edge of the allowance has to travel further than the seam line does and there is no room for it to go. A 0.7 cm allowance under a felling folder — the metal guide that rolls the seam over as it is sewn — would not be caught by the second needle. Neither of those is a preference. Both are the machine talking.
The saving somebody will ask you for
Twice a season, someone will look at the fabric line and propose taking every 1.2 cm allowance down to 1.0 cm. Know exactly what that is worth, because you will want to say no with a number, not with an opinion.
Walked off the KM-118 pattern, the total length of edge that carries an allowance is 11.8 m per garment, of which 6.2 m is drafted at 1.2 cm. That counts both sides of every seam, because both sides carry cloth.
| Step | Value |
|---|---|
| Edge affected | 6.2 m per garment |
| Cloth removed, 6.2 m at 0.2 cm | 0.0124 square metres per garment |
| At 144 cm of usable width, that is | 0.86 cm of marker per garment |
| Across 12,000 pieces | 103.2 m |
| At USD 3.15 a metre | USD 325 |
Put two honest warnings on that number before you take it anywhere. The first: it assumes the marker — the cutting plan that lays every pattern piece onto the cloth — recovers every square centimetre you take out of it, which it will not, so the real saving is smaller than USD 325. The second: it is 0.23% of a USD 141,600 order.
Against that, the felling folders on Rosetta's line are built for 1.2 cm. Six of them would have to be replaced at USD 48 each — USD 288 — plus a day of resetting and re-balancing the line. Until that is done, the second needle is running close to the raw edge on a garment that is going to be washed. You have just spent USD 288 and a day to save less than USD 325, and bought a seam risk on a washed garment.
A notch is the only instruction the operator gets
A notch is not a decoration and it is not a convenience. On a seam that carries ease, it is the only instruction anybody gives about where the ease goes.
Take the sleeve. Rev A carries 3.0 cm of cap ease. If the sleeve has notches — one at the front armhole, two together at the back, one at the shoulder point — the operator distributes the surplus inside the marked segments. None of it goes into the bottom of the armhole, where it would fold. If the sleeve has no notches, the operator distributes 3.0 cm wherever the cloth lets them, the sleeve rotates on the armhole, and the finished garment shows a sleeve that twists forward. It is read as a sewing fault. It is a pattern fault.
Three rules that will catch most of it:
- Every seam has notches on both of its pieces, or it has none. A notch on one piece only tells the operator nothing and is worse than no notch, because it looks like an instruction.
- Front and back are distinguishable. The convention is one notch at the front, a double notch at the back, on both the armhole and the sleeve. A sleeve set in backwards is not a fault an inspector will catch quickly, and it is very expensive when it is caught late.
- A drill hole sits inside the piece it marks. A pocket placement drill is set 0.5 cm inside the pocket outline so the finished pocket covers it. A drill hole on the line is a hole in the garment.
Walking a seam is not measuring it
Walking means rolling one pattern piece along the other, seam line against seam line, pivoting at each notch, and reading off the difference at the end. Measuring means running a tape along each curve separately and comparing two numbers.
They are not the same thing, and on a curve the tape is the one that lies. A tape laid along a concave (inward-curving) neckline sits inside the curve; laid along a convex (outward-curving) collar stand it sits outside it. On a 44 cm curve that difference is a few millimetres, which is exactly the size of the errors you are looking for. Worse, a tape cannot tell you where the difference sits, and the location is what tells you which piece is wrong.
The walking order for a shirt, and it is the same order every time:
- Shoulder, front to back, and to the yoke if there is one
- Side seam, front to back, from underarm to hem, and check that the hems finish flush
- Armhole against sleeve cap, and read cap ease as a percentage of the armhole
- Neckline against collar stand
- Collar stand against collar
- Sleeve underarm seam against itself
- Cuff against sleeve opening, minus the pleats
- Every seam that touches anything that changed since the last walk
Rule 8 is the whole lesson. The first seven can be done by a junior with a checklist. The eighth is judgement, and it is where the money is.
2 September: the collar that overhangs the placket
The pre-production sample went to Kestrel and Moor's quality team on 2 September. The comment came back the same day:
Collar overhangs the front placket on the right side by about half a centimetre. Top button pulls.
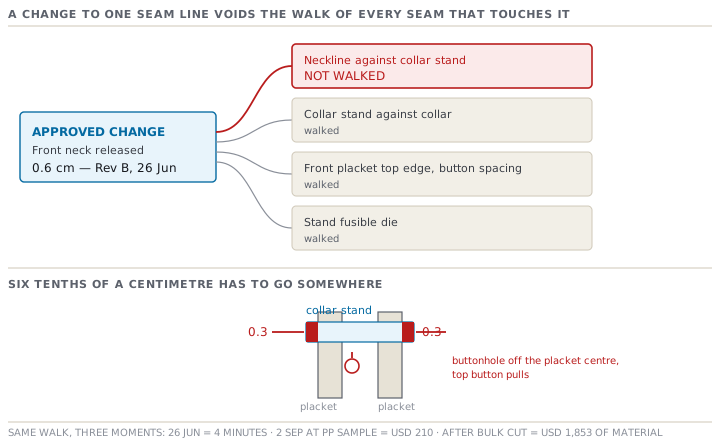
Rosetta walked the stand against the neckline and found the answer in four minutes. Neckline 44.8 cm. Stand 44.2 cm. A gap of 0.6 cm — exactly the release that had been approved on 19 June and executed on 26 June.
Six-tenths of a centimetre has to go somewhere. The operator had eased the longer neckline into the shorter stand, as any operator would, and the stand had finished 0.3 cm short at each centre front. That put the buttonhole off the placket centre, pulled the top button, and left the collar points overhanging the front edge.
Nobody made a mistake. The neckline change was requested, approved and executed correctly. The stand was never wrong on its own terms; it still measured exactly what it had always measured. The defect lives entirely in the relationship between two pieces that were each correct.
| When | What it costs |
|---|---|
| 26 June, at the same desk, with the pattern already open | Four minutes |
| 2 September, at the pre-production sample | A re-issued stand pattern, a new fusible die, two days: USD 210 |
| After the bulk cut, with stands cut for 12,000 pieces | USD 1,481 of twill, USD 372 of fusible, USD 1,853 of material before anybody counts the days the line stands still |
Prompt · Walk the pattern before it is issued
Before any pattern goes to cutting, and immediately after any change is made to a seam line.
Act as a pattern room supervisor building a walking report. Style facts: [STYLE], garment type [TYPE], the full piece list with piece names and cut quantities [PASTE IT], seam allowances per seam [PASTE THEM], and the machines and folders each seam is sewn on [PASTE THEM]. Changes made since the last walking report: [LIST EVERY ONE, WITH THE PIECE, THE MEASUREMENT AND THE AMOUNT]. Do the following. First, build the complete list of seams in this garment, each with the two pieces that meet at it. Second, mark every seam that touches a piece I changed, including the second-order ones — a seam that touches a piece that touches a changed piece — and explain each marking in one line. Third, give me the walking order as a numbered checklist, with a column for the two walked lengths, a column for the difference, and a column for whether the difference is intended ease or an error, and state the normal range for every intended ease in this garment type and fabric weight. Fourth, tell me which of these seams a tape measure will read wrongly because of curvature, and which must be walked piece against piece. Fifth, list every notch and drill mark this garment needs, which two pieces each notch appears on, and what each one instructs the operator to do. Sixth, name the checks that would catch a mismatch between two pieces that each measure correctly on their own, since a measurement check against the spec sheet will not. If a piece list or an allowance is missing, ask for it rather than assuming it.
AI can make mistakes — check anything you act on.
Check yourselfYour sleeve cap walks 2.2 cm longer than the armhole on a garment-washed twill shirt. The spec sheet has no line for cap ease. Is anything wrong?Show the answer
Probably yes, and the spec sheet will never tell you. On a woven shirt of this weight, cap ease of around 5% to 7% of the armhole is normal, so on an armhole near 50 cm you are looking for something in the region of 2.5 cm to 3.5 cm. At 2.2 cm the sleeve head will read flat and slightly pinched at the shoulder, and it will look worse after a garment wash, because the wash relaxes the cloth and makes the shortage more visible. The judgement is whether the buyer's sealed sample shows a round sleeve head or a flat one. Either can be right; only one of them matches this pattern, and the sealed sample is the document that decides it.
Check yourselfA merchandiser proposes taking every 1.2 cm seam allowance on a shirt down to 1.0 cm to save fabric. Give the answer in numbers.Show the answer
Walk the pattern for the edge length affected, multiply by the reduction to get the cloth removed, divide by the usable width to turn it into marker length, and multiply out. On KM-118 that is 6.2 m of edge, 0.0124 square metres a garment, 0.86 cm of marker, 103.2 m across 12,000 pieces, USD 325 — before allowing for the fact that a marker will not recover all of it. Then price the other side. The felling folders are built for 1.2 cm, and six replacements at USD 48 is USD 288. Add a day of line resetting, plus a raw edge running closer to the second needle on a garment that will be washed. The point is not that the answer is always no. The point is that you can only say no credibly once you have said what the saving is.