Lessons · Lesson 3 of 3
Density, extension, and the seam that passed its test
Work eleven returned trousers back to one machine setting, and learn which seam failures the stitch causes and which the cloth does.
Lesson 3 of 3 · 43 min
The situation
A seam can pass the test written into the contract and still split the first time somebody bends down. Both of those facts can be true at once. A test only reports on the property it measures. How hard you must pull two panels apart is a different question from how far the seam will stretch. It is the second one that a crotch, a knee or an armhole demands.
27 June. Kolstad shipped an early delivery of 4,200 pairs of MT-540 on 6 June, for a site trial with a facilities contractor in Bergen. Today eleven of them come back in a sack, and every one has split down the back rise — the seam that runs from the fork up to the centre back of the waistband.
11 pairs out of 4,200 is 0.26%. It is a small number and it is not a small problem. The remaining 13,800 pairs are in Meridian's warehouse waiting for a 12 July vessel. If they carry the same defect they will come back too, from a customer who bought workwear because it does not come back.
Two facts arrive with the sack and they look unrelated.
First, the back rise on MT-540 was specified as a plain seam, ISO 4916 class 1, sewn 301 lockstitch at 3.5 stitches per cm with ticket 60 core-spun thread. Meridian's own laboratory tested it before bulk and it passed the buyer's requirement comfortably. It was tested again after the returns, on garments from the same lot as the failures. It passed again.
Second, in Kolstad's inspection report from lot 2 there is an unrelated-looking note: back rise seams show light puckering, acceptable, monitor.
One cause produced both. Finding it takes an hour, and understanding it takes the rest of this lesson.
What actually happened
On 14 May the mechanic serviced the machine running the back rise operation. The bobbin case came back with its tension screw a little tight, which is easy to do and hard to see.
Within a day the operator was producing a rise seam with visible pucker. The supervisor called the mechanic back, and the mechanic did something that is in every sewing manual: he lengthened the stitch, from 3.5 stitches per centimetre to 2.8.
The pucker went away, or nearly. Everybody moved on. Nobody logged it, because a stitch length is not a change anybody thinks of as a change.
That single adjustment did two things nobody connected. It reduced the seam's strength by 20%, and it reduced how far the seam can stretch before the first stitch breaks from 24% to 15%. A man squatting in these trousers puts about 18% extension into the back rise.
The mechanic applied a correct remedy. He applied it to the wrong kind of pucker.
Three puckers, three different fixes
Seam pucker is not one defect. It has three separate causes, they look almost identical on a garment, and each has its own fix. Applying the wrong one either does nothing or does damage.
| Cause | What is happening | How to recognise it | The fix |
|---|---|---|---|
| Feed pucker | The two plies are fed at different rates, so one arrives longer than the other | Worse on long seams, worse on slippery cloth, one ply visibly fuller | Presser-foot pressure, a walking foot or needle feed, differential feed |
| Tension pucker | Thread is sewn in stretched and shortens as it relaxes | Appears or worsens minutes to hours after sewing, disappears if you unpick one thread | Reduce thread tension, balance needle against bobbin, use a lower-extension thread |
| Structural jamming | The cloth is too dense to accept the thread, so yarns are displaced | Immediate, even, on tightly woven or coated fabric only | Finer thread, finer needle, and a longer stitch |
The third row is the one every mechanic reaches for, because it is the only fix that lives on a dial he can turn without touching anything else. It is also the only one of the three that is genuinely correct on a densely woven cloth with no room left between its yarns.
MT-540 is a 280 gram twill. It is a firm cloth, and jamming is a plausible first guess. But the tell was in the timing: the pucker appeared the day after a service, not on the first garment of the style, and it got worse in the trolley. That is tension pucker, and the fix was a quarter-turn on the bobbin case, not the stitch length dial.
Lengthening the stitch did not cure the tension pucker; it made it less visible, because a longer stitch gathers less cloth per centimetre. The cause was still there. The cost was paid somewhere else entirely.
What density is actually buying
Stitch density is the most consequential number on a seam specification and the least respected, because it is the one anybody can change without asking anybody.
Course 2.5 gives the working estimate the trade uses for a lockstitch seam:
Seam strength per cm = stitches per cm x thread breaking strength x 1.5Ticket 60 core-spun polyester breaks at 30.0 newtons. So:
| Specified | As sewn after 14 May | |
|---|---|---|
| Stitches per cm | 3.5 | 2.8 |
| Stitches per inch | 8.9 | 7.1 |
| Seam strength per cm | 157.5 N | 126.0 N |
| Kolstad's minimum | 120 N | 120 N |
| Verdict against the minimum | Pass | Pass |
Look at the last row before you read on. The seam lost 31.5 newtons per centimetre, which is 20% of its strength, and it still passes the buyer's written requirement. The laboratory was not wrong and it was not careless. It measured the right thing and the right thing was not what failed.
The property nobody specified
A seam strength test pulls the two panels apart, across the seam. That is what the standard grab method for seam breaking force does, and it is what the buyer's requirement is written against.
A squat does not do that. A squat stretches the back rise along its length. And a seam's ability to extend along its length has almost nothing to do with the force it takes to pull it apart. It depends on how much thread is sitting in each centimetre of seam, and how that thread is arranged.
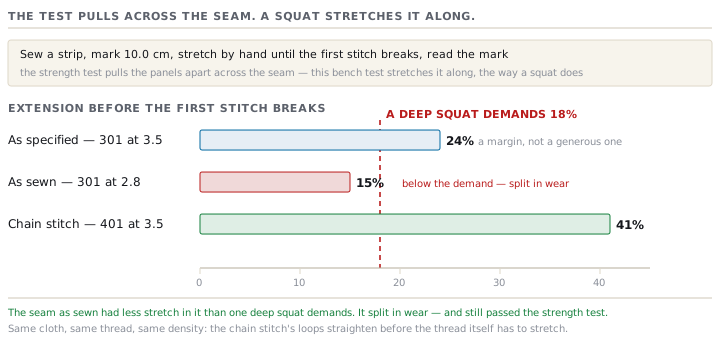
Meridian's technician did the test on the bench in twenty minutes, with a ruler. Sew a 20 cm strip, mark 10.0 centimetres on it, stretch it slowly by hand until the first stitch pops, and read the mark.
| Seam | Marked length at break | Extension |
|---|---|---|
| 301 at 3.5 stitches per cm, as specified | 12.4 cm | 24% |
| 301 at 2.8 stitches per cm, as sewn | 11.5 cm | 15% |
| 401 at 3.5 stitches per cm | 14.1 cm | 41% |
| What a deep squat demands of this rise | — | 18% |
There is the whole failure in four rows. The specified seam had 24% of extension against a demand of 18% — a working margin, not a generous one. The seam as sewn had 15%, which is below the demand, so it broke the first time somebody bent down properly. And a 401 chain stitch, on the same cloth at the same density, would have given 41%, because a chain stitch's loops can straighten before the thread itself has to stretch.
The lockstitch was the wrong stitch for a back rise even before the mechanic touched the machine. The stitch length change is what turned a thin margin into a failure, but the margin was thin because a rise is a high-extension seam and it had been given a low-extension stitch.
The failure the stitch did not cause
There is a second seam failure that arrives looking exactly like a sewing defect and is not one. A merchandiser who cannot tell the two apart will spend a week arguing with the wrong department.
Seam slippage is the yarns of the cloth pulling away from the stitch line and leaving a gap, without a single thread breaking. The stitching is intact. The fabric has moved. It is measured under a fixed load and reported as the width of the opening. Kolstad's requirement is that a seam opens no more than 6 mm under 120 newtons, tested to the fixed-load method of ISO 13936-2.
MT-540 in the 280 gram twill opens 3.2 mm. It passes with room.
The summer version of the same style, MT-541, is cut in a 165 gram poplin. Same stitch type, same density, same thread, same needle, same operator, same machine. It opens 8.4 mm and fails.
Nothing about the sewing changed, and nothing about the sewing can fix it, because slippage is a property of the weave: how tightly the yarns are packed and how much they grip each other. A loosely constructed cloth lets its yarns migrate under load, and the stitch line is simply where the load is concentrated.
What Meridian tried, in order:
- Increasing the stitch density. Helped slightly and did not come close.
- Widening the seam allowance from 10 mm to 15 mm. Took it from 8.4 mm to 6.8 mm. Still a fail.
- Changing the seam class. A lap-felled class 2 seam spreads the load across two rows of stitching and four plies of cloth instead of one row and two. It opened 4.1 mm and passed.
That is the answer, and notice where it came from: a seam problem the stitch could not solve was solved by the seam class, which is the other half of the notation lesson 1 set out. This is why the two numbers are independent, and why a specification that carries only one of them is only half written.
What the failure cost
Kolstad accepted a rework rather than a cancellation, which was generous and reflected a ten-year relationship.
| Pairs | Rate | Cost | |
|---|---|---|---|
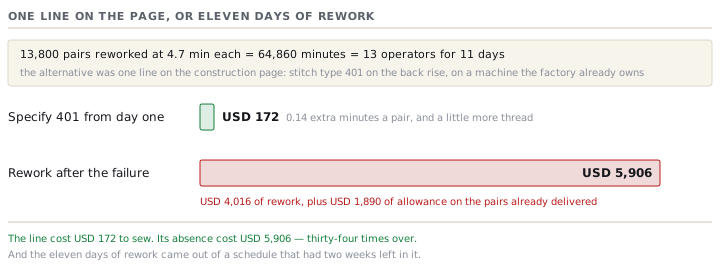
| Rework the back rise: unpick, re-sew 401, press, re-inspect at 4.7 min | 13,800 | USD 0.291 a pair | USD 4,016 |
| Allowance on the pairs already delivered | 4,200 | USD 0.45 a pair | USD 1,890 |
| Total | USD 5,906 |
That is 2.8% of the order value, and it consumed eleven working days of a schedule that had two weeks left in it. 13,800 pairs at 4.7 minutes is 64,860 minutes, which at 459 productive minutes a day is 141 operator-days, or 13 operators doing nothing else for eleven days.
Now price the alternative. Specifying 401 on the back rise from the beginning would have moved the operation from a machine Meridian owns to a different machine Meridian also owns, and lengthened it from 0.72 to 0.86 minutes. That is 0.14 minutes, or USD 0.009 a pair, which is USD 162 across the order. The chain stitch's extra thread adds about USD 10 more. Call it USD 172.
USD 172 of specification against USD 5,906 of rework — thirty-four times over, for one line on a page that already existed.
Prompt · Diagnose a seam that failed, before you change anything
When garments come back with open seams, or an inline check finds pucker, and somebody is about to change the thread.
Act as a quality engineer diagnosing a seam failure. Do not propose a fix until you have separated the possible causes. What I have: garment [STYLE], fabric [COMPOSITION, WEIGHT, WOVEN OR KNIT], the seam that failed [WHICH ONE], its specification [STITCH TYPE, SEAM CLASS, STITCH DENSITY, THREAD TICKET AND CONSTRUCTION, NEEDLE, SEAM ALLOWANCE], what was actually measured on the failed garments [STITCH DENSITY COUNTED, THREAD, NEEDLE], the failure as described [PASTE THE COMPLAINT], quantity affected and quantity still in the factory, and any laboratory results with the test method named [PASTE THEM]. Work through this. First, from the description, say whether the threads are broken or the stitching is intact with the cloth pulled away, and explain which department each of those belongs to. Second, if the threads broke, compute the seam strength per centimetre as specified and as actually sewn, and compare both against the buyer's minimum. Third, separately from strength, ask whether this seam is EXTENDED in wear, estimate how far, and compare it with the extension the stitch type can give at that density — say plainly if the stitch class is wrong for the seam regardless of what any test reported. Fourth, if pucker is involved, decide which of the three puckers it is from the timing and the pattern, and give the fix for that one only. Fifth, list every test the buyer's specification does NOT include that would have caught this. Sixth, cost the containment and the rework against the cost of having specified it correctly, both as a figure per garment and across the order. End with the one line that should be added to the specification so this cannot recur.
AI can make mistakes — check anything you act on.
Check yourselfA seam passes its strength test in the laboratory and splits in wear. Give three explanations that are all consistent with both facts.Show the answer
First, the test measures a different property from the one that failed. Seam breaking force pulls across the seam, while a rise, a knee or an armhole is extended along it, and extension is governed by how much thread sits in each centimetre. That is why a lockstitch can pass a strength test and still break in a squat. Second, the garments tested are not the garments that failed: a laboratory tests a pre-production sample or a first-lot piece, and something changed afterwards — a stitch length, a thread, a needle, an operator, a machine. Third, the test is a static single pull and wear is repeated loading, so a seam close to its limit fails by fatigue after some number of cycles rather than on the first one. All three are common, and the first two are what happened on this order at the same time.
Check yourselfTwo seams open in wear. One shows broken threads along the seam line; the other shows intact stitching with the cloth pulled away from it. Are these the same defect?Show the answer
No, and they belong to different departments. Broken threads mean the seam failed: the load exceeded what the stitching could carry. So look at stitch type, stitch density, thread ticket and construction. Look too at whether any of them changed after the specification was written. Intact stitching with the fabric pulled away from it is seam slippage, and the sewing is innocent. The yarns of the cloth have migrated under load, which is a property of the weave's tightness and the yarns' grip on each other. You cannot sew your way out of it. There are three levers. A wider seam allowance helps a little. A seam class that spreads the load over more rows and more plies helps a lot. A different fabric is the only certain answer. Diagnosing the second as the first is how a factory spends a week changing thread on a problem the mill caused.